Wednesday, August 26, 2009

SQL Database Restore


SQL Database Restore


1. Copy the back file to the local server.
2. Open Microsoft sql server management studio.
3. Expand the database, right click on task --- click on restore database.
4. Under General page click on From device, select the file location and add.
5. Now click on the check box to restore.
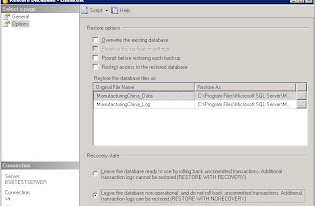
6. Now click on the options page, click RESTORE WITH NORECOVERY option under recovery state.
7. Click ok.


--Note now you have the database backed up say upto last midnight at 12:00 . Now we need to add the transaction log back up upto current time say 11:40 am in the morning.


8. Now we need to repeat step 3 but select the .trn file (i.e., the transaction log back up file) please refer to my earlier post on SQL Backup.
9. Click on the check box for the restore upto what time you would like to restore, the date and time is mentioned if you scroll.
10. In the options please note to select click RESTORE WITH RECOVERY option under recovery state.

SQL Backup

SQL Database Backup Plan

Database backup and restore can be achived by the following


1. First step is to do the back up

BACKUP DATABASE [ManufacturingChina] TO
DISK = N'Z:\DATABASE\ManufacturingChina_backup.bak' WITH NOFORMAT,
INIT, NAME = N'ManufacturingChina_backup', SKIP, REWIND, NOUNLOAD, STATS = 10


--NO FORMAT - specifies that the media header should not be written on all volumes used for this backup operation. This is the default behavior.

--INIT - Specifies that all backup sets should be overwritten

--SKIP - Disables the checking of backup set expiration and name that is usually performed by the BACKUP statement to prevent overwrites of backup sets.

--NOREWIND -Used only with TAPE devices to improve performance when performing multiple backup operations to a loaded tape

--SQL Server will retain ownership of the tape drive until a BACKUP or RESTORE command is used with either the REWIND or UNLOAD option or the server is shut down.

2. step 2 is to do the log back up with INIT that is to overwrite

BACKUP LOG [ManufacturingChina] TO DISK =
N'Z:\DATABASE\ManufacturingChina\ManufacturingChina.trn'
WITH NOFORMAT, INIT, NAME = N'ManufacturingChina-Transaction Log Backup',
SKIP, NOREWIND, NOUNLOAD, STATS = 10
GO


3. the above two scripts to be on one job scheduled at says 12:00 midnight

4. now we need to do the log back up with NOINIT that is with append

BACKUP LOG [ManufacturingChina] TO DISK = N'Z:\DATABASE\ManufacturingChina\ManufacturingChina.trn' WITH NOFORMAT, NOINIT, NAME = N'ManufacturingChina-Transaction Log Backup', SKIP, NOREWIND, NOUNLOAD, STATS = 10GO

5. Finally to keep the size of the database in tact

DBCC SHRINKFILE (N'ManufacturingChina_Log' , 786)

786 is the default size given in this example, you can provide the size based on the database default log size.

6. Step 4 and 5 can be scheduled on a separate job

Saturday, August 22, 2009

SQL Job failure


This script identifies failure of sql jobs to the connected sql instance.

USE [master]
GO
/****** Object: StoredProcedure [dbo].[up_sqljob_check] Script Date: 08/22/2009 09:22:17 ******/
SET ANSI_NULLS ON
GO
SET QUOTED_IDENTIFIER ON
GO
ALTER procedure [dbo].[up_sqljob_check]
as
begin
-- Variable Declarations
DECLARE @PreviousDate datetime
DECLARE @Year VARCHAR(4)
DECLARE @Month VARCHAR(2)
DECLARE @MonthPre VARCHAR(2)
DECLARE @Day VARCHAR(2)
DECLARE @DayPre VARCHAR(2)
DECLARE @FinalDate INT

-- Initialize Variables
SET @PreviousDate = DATEADD(dd, -1, GETDATE()) -- Last 7 days
--select @PreviousDate
SET @Year = DATEPART(yyyy, @PreviousDate)
SELECT @MonthPre = CONVERT(VARCHAR(2), DATEPART(mm, @PreviousDate))
SELECT @Month = RIGHT(CONVERT(VARCHAR, (@MonthPre + 1000000000)),2)
SELECT @DayPre = CONVERT(VARCHAR(2), DATEPART(dd, @PreviousDate))
SELECT @Day = RIGHT(CONVERT(VARCHAR, (@DayPre + 1000000000)),2)
SET @FinalDate = CAST(@Year + @Month + @Day AS INT)
--select @FinalDate
-- Final Logic
/*
SELECT j.[name],
s.step_name,
h.step_id,
h.step_name,
h.run_date,
h.run_time,
h.sql_severity,
h.message,
h.server
FROM msdb.dbo.sysjobhistory h
INNER JOIN msdb.dbo.sysjobs j
ON h.job_id = j.job_id
INNER JOIN msdb.dbo.sysjobsteps s
ON j.job_id = s.job_id
AND h.step_id = s.step_id
WHERE h.run_status = 0 -- Failure
AND h.run_date > @FinalDate
and enabled = '1'
ORDER BY h.instance_id DESC
*/
DECLARE @tableHTML NVARCHAR(MAX) ;
SET @tableHTML = N'

SQL Job Failures on 34 server

' +
N' ' +
N' '+
-- N' ' +
N'' +
CAST ( ( select distinct
'2' "td/FONT/@Size", j.name "td", ''
-- '2' "td/FONT/@Size", h.message "td", ''
FROM msdb.dbo.sysjobhistory h
INNER JOIN msdb.dbo.sysjobs j
ON h.job_id = j.job_id
INNER JOIN msdb.dbo.sysjobsteps s
ON j.job_id = s.job_id
AND h.step_id = s.step_id
WHERE h.run_status = 0 -- Failure
AND h.run_date > @FinalDate
and enabled = '1'
--ORDER BY h.instance_id DESC
FOR XML PATH('tr'), TYPE
) AS NVARCHAR(MAX) ) +
N'
NameMessage
' ;
declare @count numeric
SELECT @count = count( distinct j.[name] )
FROM msdb.dbo.sysjobhistory h
INNER JOIN msdb.dbo.sysjobs j
ON h.job_id = j.job_id
INNER JOIN msdb.dbo.sysjobsteps s
ON j.job_id = s.job_id
AND h.step_id = s.step_id
WHERE h.run_status = 0 -- Failure
AND h.run_date > @FinalDate
and enabled = '1'
select @count
if @count > 1
begin
EXEC msdb.dbo.sp_send_dbmail
@recipients = '',
--@copy_recipients = '',
@subject = ' SQL Job failures on 34 server',
@body = @tableHTML,
@body_format = 'HTML' ;
end
end
--select * from MSDB.dbo.sysjobs

OLAP Cube Processing

Olap cube processing

1. The olap cube and the dimensions has to be prcessed to have the updates.
2. This can be done manually or automatic.
3. Manual process --- to open sql server management studio, connect to analysis services, click on the analysis database dimensions first --- dimensions will be listed on the explorer details window on the side, select all right click and process.
4. Now click the dimension --- right click and process.
5. If there are errors in processing please check you data first, for example primary key validation, datetime format.


Now let us see how to automate the process.

1. Using the manual process above click on script to generate the scripts. copy in a notepad.

2. Open microsoft sql server management studio.

3. Connect to the database.

4. Open sql server agent.

5. Click on jobs --- right click and click on new job.

6. Clcik on general --- enter the name of the job, please not you should rights on the database to perform this job.

7. Now click on the step --- click new step, enter the step name, select the type as sql server analysis services command , under run as -- select sql agent service account, now copy the scipt under the command, click ok

8. Click on the schedule -- schedule it.

9. Click on notifications --- select the mail to be notified if the job fails.

Friday, August 21, 2009

Create a olap cube

To create a olap cube

The following is advised to be known
1. Please make sure the tables to be used are in line with your requirement. for example - sales analyis in a company by customer, by product type, by reps and by jobnumber.

2. Also have the calendar table included to view by year,quater,month and date.

3. To create this table please refer to my earlier post in SSAS.

4. After this is done open the sql server business intelligence studio.

5. Click new project --- business intelligence projects --- analysis project --- under browse select the location where the project is been saved.

6. In the data sources --- create a new datasource, use the windows authentication account. In the data source view --- create a new data source select the tables to be used in the cube.

7. In the cube right click and follow the wizard, click on build the cube using a data source, click next --- select the fact (are measure where the numeric values stored e.g., grossprice, totalnet price ) and dimension tables (used for filter e.g., by product type, by invoicdate) --- clik next
now select the measures to be displayed, click next --- it will required to select atleast one dimension ( note dimensions can be created later) --- click next --- give a name for the cube and finish.

8. Now having created the cube with one dimension additional dimensions can be created, but before, click on the green arrow to process the cube, you might get an error if you have not set the deployment server. Go to menu project --- properties and click on deployment and specify the server name e.g., 192.0.0.111\MSSQ1 do not forge the instance name.

9. Now press F5 or click on the green arrow and process the cube, you should see something similar to image below.

10. Addition dimensions can be added dimension right click --- new dimension --- click next --- build the dimension using a new source -- check on autobuild --- click next --- click on standard dimension or time dimension --- click next --- select the table --- check the field you need to filter --- e.g., by product type.

repeat step 10 for additional dimensions.

Hosting OLAP Reports


To host olap reports on windows server 2008 using IIS Manager
Make sure you have the olap cube on the asp.net project and wanted to host, follow the steps below.

1. Copy the application folder containing the bin, obj, my project folder and files default.aspx,defualt.aspx.vb, to the c:\inetpub\wwwroot
2. Go to administrative tools --- iis manager
3. Open default web site --- click the folder you had copied.
4. Right click the folder you had copied --- click convert to application.
5. Change the application pool to --- Classic .NET AppPool
6. Make the sure the folder in c:\inetpub\wwwroot\ has appropriate rights to access the hosted application.


Thursday, August 20, 2009

Databases not backed in a server

--This query will let you know the databases not backed up in a server


SELECT MAX(ISNULL(DATEDIFF(dd,ISNULL(b.backup_start_date, '01/01/1900'),GETDATE()),0)) AS 'NumDays'
, d.name as 'DBName'
FROM master..sysdatabases d
LEFT JOIN msdb..backupset b ON d.name = b.database_name
AND b.backup_start_date = (SELECT MAX(backup_start_date)
FROM msdb..backupset b2
WHERE b.database_name = b2.database_name AND b2.type IN ('D','I'))
WHERE d.name != 'tempdb'
--AND d.name NOT IN (SELECT db_name FROM dbautility.dbo.db_exclude)
AND DATABASEPROPERTYEX(d.name, 'Status') = 'ONLINE'
GROUP BY d.name, b.type, b.backup_size
HAVING MAX(ISNULL(DATEDIFF(dd,ISNULL(b.backup_start_date, '01/01/1900'),GETDATE()),0)) > 1

SSAS-Calculation member error

When accessing calculation tab in Business Intelligence Development Studio (BIDS) I am getting error "Unexpected error occurred:Error in application".

Fix / Workaround/Solution


Most likely this error is caused by mismatched SSAS dlls: msmdlocal.dll and msmgdsrv.dll. To fix this move this 2 dlls from folder:

c:\Program Files\Microsoft Visual Studio 8\Common7\IDE\PrivateAssemblies\
To folder:
c:\Program Files\Common Files\System\Ole DB\


Note: Before replacing any dll make sure you backup them to safe location.

This solution worked for me.

Thursday, August 13, 2009

Converting DateTime to Date

Converting Datetime to date in a table

Updating all the bookdate in a table from datatime to date
For example tablename = t1

update t1 bookdate = convert(varchar(10),bookdate,101)


converting datetime to date

convert(varchar(10),getdate(),101)

Installing SQL Server 2005

Installing SQL Server 2005 standard edition and windows 2008

Please make sure all the pre-requisties are installed.
  1. The important componnet IIS Feature to be installed, with all the relevent components.click on start --- server manager ---- roles --- add roles.if IIS is intalled and to need the required components please click on Web services IIS --- go to Role services --- add roles.Make sure the follow compnents are added.

  • Web Management Tools
  • IIS 6 Management Compatibility
  • IIS 6 WMI Compatibility IIS Metabase and
  • IIS 6 configuration compatibility
  • World Wide Web Services
  • Application Development .NET Extensibility
  • ASP.NET
  • ISAPI Extensions
  • ISAPI Filters Common
  • HTTP Features
  • Default Document Directory Browsing
  • HTTP Redirection Static Content Security Windows Authentication

2. Now insert the CD and click on setup if autorun does not run.

3. Please clikc next and go through the normal installation.

4. When you get the window system configuration check make sure there is no warning message.

5. If there is message on IIS do not continue make sure the IIS component is completed or if there is warning message on Edition change, note there is a existing sql 2005 installed on this system.

6. To install another version start the cd from the command prompt. type in D:\setup.exe SKUUPGRADE=1

7. Now when there is no warning message click next, select the components you want to install.

8. Enter the instance name for example : MSSQL1

9. Now use the domain account to set up. for example username : vijay password : vijay domain : DOM

10. Select the authentication mode windows mode or mixed mode. This can be changed to mixed mode later as well.

11. Make all the selected components are installed successfully.

To check the installed components, let us first check sql server services.

1. Open sql management studio and select database services and enter username and password based on your authentication selection either windows or sql authentication.

2. When connected you have successful sql database services installed.

3. If not click on sql server configuration manager and start the sql server service.

To check Analysis services

1. Open sql management studio and select analysis services, this is opened through windows authentication.

2. When connected you have successful analysis services installed.

3. If not click on sql server configuration manager and start the analysis services.

To check Reporting services
1. Open sql management studio and select reporting services, this is opened through windows authentication.

2. When connected you have successful reporting services installed.
3. If not click on sql server configuration manager and start the reporting services.


4. Click on Reporting services configureation make sure the following is on.
  • Server status --- running
  • Report virtual directory --- name : reportserver --- website : default website
  • Report manager virtual directory --- name : reports --- website : default website
  • Windows services Identity --- service name : reportserver$MSSQL1 --- service account : localsystem builtin account : local system please note in this example MSQL1 is the sql instance name
  • Web services Identity --- asp.net service account : NT Authority\NetworkService --- report server: reportserver$MSSQL1 --- report manager : reportserver$MSSQL1
  • Database setup ---- server name : local(MSSQL1) --- database name : reportserver --- credential type : windows credentials --- account name ---- DOM\vijay ( please note the user name you had given earlier for installation)
  • email setting : sender name : emailid (or any other company email id) --- current delivery method --- user smtp server ---- smtp server ---- enter the ip address of smtp server.

If there is still error on the reporting services

Fix / workaround solution

please go to C:\Program Files\Microsoft SQL Server\MSSQL.3\Reporting Services\ReportManager

open the RSWebapplicaton file on the notepad and check the following.

1.ReportServerUrl>

2.reportServerVirtualDirectory>ReportServer ( this is the name on the virtual directory of the report server configuration.

3. FullTrust


Tuesday, August 11, 2009

DATABASE MIRRORING - SQL 2005

Database Mirroring

Let us do database mirroring between two servers. In this example we are using sql 2005 standard edition with service pack 2.


I.Please note the database mirroring can also be done on the same server with multiple instances.


I. Before you get started with database mirroring please make sure the following are checked.
1. The principal and mirror server are either standard or enterprise edition. Please note we can also use the witness server for automatic failover.
2. The principal and mirror server are on the same service pack.(Recommended service pack 2). It is available for download from Microsoft. Please use the appropriate version based on 64 bit edition, 32 bit edition or 32 ia edition.
3. Please make sure there is sufficient disk space available on both the servers principal and mirror server.
4. The principal server should be on FULL RECOVERY option. This can be set by right click on the database on the principal server --- click properties --- click options --- set to FULL RECOVERY.
5. Make sure the SQL SERVER CONFIGURATION --- click on SQL SERVER instance --- properties --- check if this in Built in account or This Account makes sure the same is applicable for the mirror server.
6. Make sure you connectivity to the mirror server from the principal server. i.e., you can connect the mirror server from the principal server, in the sql server management studio.
The following sql script can be used to identify the version and service pack.
--to identify the version of sql
SELECT SERVERPROPERTY('productversion'), SERVERPROPERTY ('productlevel'), SERVERPROPERTY ('edition')

II. After check the above now we are ready to create the end points.
-- to create endpoint on principal server
Create endpoint [endpoint1mirroring]
state = started
as tcp (listener_port = 1430, Listener_ip = all)
for data_mirroring (role = partner, authentication = windows negotiate,
encryption = required algorithm rc4)

-- to create end point on mirror server
create endpoint [endpoint1mirroring]
state = started
as tcp (listener_port = 1440, Listener_ip = all)
for data_mirroring (role = partner, authentication = windows negotiate,
encryption = required algorithm rc4)


-- to create end point on witness server we do not have it in this example
create endpoint [endpoint1mirroring]
state = started
as tcp (listener_port = 1450, Listener_ip = all)
for data_mirroring (role = partner, authentication = windows negotiate,
encryption = required algorithm rc4)

--to check the endpoints
select name,type_desc,port,ip_address from sys.tcp_endpoints
select name,role_desc,state_Desc from sys.database_mirroring_endpoints


--granting permissions this is optional from principle server or instance
grant connect on endpoint ::mirroring to [servername\vijay];

---from mirror server or instance this is optional
grant connect on endpoint : : endpoint4mirroring to [servername\vijay];

---from witness server or instance this is optional
grant connect on endpoint : : endpoint4mirroring to [servername\vijay];

III. Now on the principal server we need to the backup.

--backup database
backup database [databasename] to disk = N'E:\Transfer\db1.bak' with format

--backup log
backup log [databasename] to disk = N'E:\Transfer\db1log.bak' with format

IV. Now on the mirror server we need to the restore.

--restore database
restore database databasename
from disk = 'c:\transfer\db1.bak'
with norecovery,
move 'db1_Data' to 'E:\db1_Data.mdf',
move 'db1_Log' to 'F:\db1_Data.ldf',

please note the restore of the log will also have to be with NO RECOVERY option

--restore database
restore database databasename
from disk = 'c:\transfer\db1log.bak'
with norecovery,
move 'db1_Data' to 'E:\db1_Data.mdf',
move 'db1_Log' to 'F:\db1_Data.ldf',


V. Now we have created the endpoints. We can now use the mirroring wizard to create mirroring.

Right Click on the principal database --- click properties --- click mirroring – click on configure security --- say no on witness server option (reminder this example is without witness server) – so check No option – click next --- click on the principal and mirror server and click next ---
The principal server is identified with ip or name with default port number --- click next --- select the mirror server ip --- connection as domain\username --- ( please note there should be no warning message on the screen) --- click next ---- service accounts can be left blank or provide the domain\username ---- click finish --- Start Mirroring.


This principal database will show as databasename (Principal, synchronized)

The mirror database will show as databasename (Mirror,synchronized,restoring) --- please note this database cannot be used at this state.

To check if the database mirroring is working click on the principal server database ---- right click properties --- click mirroring --- click failover.


SQL Error 1418 - DB Mirroring

Error: 1418 – Microsoft SQL Server – The server network address can not be reached or does not exist. Check the network address name and reissue the command

Fix/Work Around / Solution

1. Make sure the principal and mirror server are standard or enterprise edition.

2. Make sure both have the same service packs ( recommended).

3. Make the firewall on the server are not blocking the port. To check this you can use telnet. Telnet from command prompt as c:/telnet servername portnumber --- this will return blank screen when success else will return message.

4. Make sure the account of MSSQL Server is same in both the servers. i.e., under sql server configuration manager --- click sql server 2005 services --- select sql server ---- right click properties --- built in account or this account. Make sure both have the same.

5. Go to Computer Management >> Service and Application >> SQL Server 2005 Configuration >> Network ConfigurationEnable TCP/IP protocol. Make sure that SQL SERVER port is by Default 1433.

6. Make sure the principal database is backed up and restored in mirror server with norecovery option.

7. Make sure the principal datbase log is backed up and restored in morror server with norecovery option.


Monday, August 10, 2009

Reporting Services ---- error - No report servers are found on the specified system.

The follow error occurs when you try to configure reporting services.

Error - No report servers are found on the specified system.

Check the following

1. Reporting services is installed.
2. If installed make sure the services is started in --- start --- administrative tools --- services
3. If reporting services is not installed possible readon IIS is not installed or installed partially not all components.

For Reporting Services, the following IIS components should be installed:
Web Management Tools
IIS 6 Management Compatibility
IIS 6 WMI Compatibility
IIS Metabase and IIS 6 configuration compatibility
World Wide Web Services
Application Development
.NET Extensibility
ASP.NET
ISAPI Extensions
ISAPI Filters
Common HTTP Features
Default Document
Directory Browsing
HTTP Redirection
Static Content
Security
Windows Authentication

Make sure the above IIS componenents are installed.

For windows server 2008 --- click start --- server manager --Roles --- add roles --- click IIS and follow the steps and guidelines.
If IIS is already installed then click on (Web server)IIS --- go to role services ---add role services --- select components to install and follow the guidelines.

After this successful installation of IIS. Go to control panel --- programs --- programs and features --- click on sql server 2005 --- change --- and point to the setup.exe file from the sql server CD, and install reporting services.

Friday, August 7, 2009

Calendar Table for olap dates - sql script

Table for OLAP date
--------------------
How It Works:
GetLastFridayOfMonthForYearRange.sql
This query populates a table called FinancialMonths with the date of every last Friday in a 12 month period based on financial year range (startdate, end date) entered.

Last Friday is found as follows: the query check when you start a new month (1/?/????) (@currentMonth <> month(@StartDate) it then takes 7 days off the current date (@startDate) and loops backwards until it finds the first Friday ( last Friday of prev month) and inserts into new table


DECLARE @StartDate as datetime
DECLARE @endDate as datetime
DECLARE @currentMonth as integer
SET @StartDate = '2010-07-01'
SET @EndDate = '2011-06-30'

DECLARE @lastFridayOfPrevMonthDate as datetime
DECLARE @getLastFridayDateCounter as datetime


SET @currentMonth = month(@StartDate)
seT @lastFridayOfPrevMonthDate = @StartDate


WHILE @startDate < @endDate BEGIN --GET LAST FRIDAY CODE IF @currentMonth <> month(@StartDate)
BEGIN
SET @getLastFridayDateCounter = dateadd(dd,-1,@StartDate)
WHILE @getLastFridayDateCounter < @StartDate BEGIN IF UPPER(DATENAME(WEEKDAY,@getLastFridayDateCounter)) = 'FRIDAY' BEGIN SET @lastFridayOfPrevMonthDate = @getLastFridayDateCounter --END LOOP SET @getLastFridayDateCounter = @StartDate + 1 END ELSE BEGIN SET @getLastFridayDateCounter = @getLastFridayDateCounter - 1 END SET @currentMonth = month(@StartDate) END --insert into FinancialMonth Select @lastFridayOfPrevMonthDate END SET @startDate = @startDate +1 END --last month end date is not a last friday insert on its own --insert into FinancialMonth Select @endDate ------------------------------------------------------------------------------------ Olap Solution.sql A Record needs to be inserted on a per day basis in Calendar table. The query loops per day from the startdate of given financial year to the end date. For each day is checks if this date is a last Friday (from table above previously populated) and upates set of variables relating.Similiarly every day and weekly variables are updated. DECLARE @StartYearDate as datetime DECLARE @EndYearDate as datetime DECLARE @quarterStartDate as datetime DECLARE @quarterCount as integer DECLARE @day_of_year as integer DECLARE @currentMonth as integer DECLARE @lastFridayOfPrevMonthDate as datetime DECLARE @getLastFridayDateCounter as datetime DECLARE @monthQuarterCount AS INTEGER Declare @monthStartDate as datetime Declare @weekDate as datetime declare @weekNo as integer Declare @dayOfQuarter as integer Declare @dayOfMonth as integer Declare @weekOfYear as integer Declare @monthOfYear as integer Declare @monthOfQuarter as integer Declare @quarterOfYear as integer Declare @financialYear as varchar(20) -------------------------------------------------------------------------------- --update these 3 variable prior to calendar insert on a per fin year basis ----- -------------------------------------------------------------------------------- SEt @financialYear = '2010-2011' SET @StartYearDate = '2010-07-01' SET @EndYearDate = '2011-06-30' --delete from tblbsbcalendar_Marguerite -------------------------------------------------------------------------------- -------------------------------------------------------------------------------- -------------------------------------------------------------------------------- SET @quarterCount = 1 SET @day_of_year = 0 SET @currentMonth = month(@StartYearDate) SET @monthQuarterCount = 1 seT @lastFridayOfPrevMonthDate = @StartYearDate SET @quarterStartDate = @StartYearDate SET @weekDate= @StartYearDate SET @weekNo = 1 set @dayOfQuarter = 0 set @dayOfMonth = 0 set @weekOfYear = 1 set @monthOfYear = 1 set @monthOfQuarter = 1 set @quarterOfYear = 1 WHILE @StartYearDate <= @endYearDate BEGIN --ALWAYS UPDATE THESE COUNTERS SET @day_of_year = @day_of_year + 1 SEt @dayOfQuarter = @dayOfQuarter + 1 set @dayOfMonth = @dayOfMonth + 1 --every financial month update variables IF Exists(Select LastFriday from FinancialMonth where LastFriday = @StartYearDate-1) BEGIN SELECT @lastFridayOfPrevMonthDate = LastFriday +1 from FinancialMonth where LastFriday = @StartYearDate-1 SET @dayOfMonth = 1 Set @monthOfYear = @monthOfYear + 1 SEt @monthOfQuarter =@monthOfQuarter + 1 IF @currentMonth = 12 SET @currentMonth = 1 ELSE SET @currentMonth = @currentMonth + 1 -- UPDATE QUARTER COUNT IF NECESSARY WHEN MONTH CHANGES SET @monthQuarterCount = @monthQuarterCount + 1 IF @monthQuarterCount > 3
BEGIN
Set @quarterOfYear = @quarterOfYear + 1
SET @monthQuarterCount = 1
SEt @dayOfQuarter = 1
SEt @monthOfQuarter = 1
SET @quarterStartDate = @lastFridayOfPrevMonthDate + 1
SET @quarterCount = @quarterCount + 1
END
END
--every week updates
IF UPPER(DATENAME(WEEKDAY,@StartYearDate)) = 'SATURDAY'
BEGIN
set @weekDate= @StartYearDate
SET @weekNo = @weekNo + 1
Set @weekOfYear = @weekOfYear + 1
END


-- INSERT CODE---------------------------------------------------------------------------------------------------------------------------
insert into tblcalendar_table

SELECT @StartYearDate as pk_date,
DATENAME(weekday, @StartYearDate) +', ' + DATENAME(MM, @StartYearDate) + ' ' + DATENAME(DD, @StartYearDate) + ' ' + DATENAME(YY, @StartYearDate) as Date_Name,
cast(cast(year(@StartYearDate) as varchar) + '-01' + '-01' as datetime) as [Year],
'Calendar ' + @financialYear as Year_Name,
@quarterStartDate as Quarter,
'Quartor ' + cast(@quarterCount as varchar) + ', ' + @financialYear as Quarter_Name,
@lastFridayOfPrevMonthDate as [Month],
case @currentMonth
When 1 then 'January'
When 2 then 'February'
When 3 then 'March'
When 4 then 'April'
When 5 then 'May'
When 6 then 'June'
When 7 then 'July'
When 8 then 'August'
When 9 then 'September'
When 10 then 'October'
When 11 then 'November'
When 12 then 'December'
END + ' ' + @financialYear,
@weekDate as week,
'Week ' + cast(@weekNo as varchar) + ', ' + @financialYear as week_name,
@day_of_year as day_of_year,
'Day ' + cast(@day_of_year as varchar) as day_of_year_name,
@dayOfQuarter as Day_of_Quarter,
'Day ' + cast(@dayOfQuarter as varchar) as day_of_quarter_name,
@dayOfMonth as day_of_month,
'Day ' + cast(@dayOfMonth as varchar) as day_of_month_name,
DATEPART(weekday,@StartYearDate) as day_of_week,
'Day' + cast(DATEPART(weekday,@StartYearDate) as varchar) as day_of_week_name,
@weekOfYear as day_of_year,
'Week ' + cast(@weekOfYear as varchar) as day_of_year_name,
@monthOfYear,
'Month ' + cast(@monthOfYear as varchar),
@monthOfQuarter,
'Month ' + Cast(@monthOfQuarter as varchar),
@quarterOfYear,
'Quarter ' + cast(@quarterOfYear as varchar)
SET @StartYearDate = @StartYearDate +1
END
Thursday, August 6, 2009

Database backup and restore - sql scripts

--call the database for example manufacturing

--back up database
backup database [manufacturing] to disk = N'E:\Transfer\manufacturing.bak' with format

--back up log this is not required
backup log [manufacturing] to disk = N'E:\Transfer\manufacturinglog.bak' with format

--restore database
restore database manufacturing
from disk = 'c:\transfer\manufacturing.bak'
with recovery,
move 'Manufacturing_Data' to 'E:\Manufacturing_Data.mdf',
move 'Manufacturing_Log' to 'F:\Manufacturing_Data.ldf'

Converting Rows to Columns using PIVOT - SQL scripts


select * from t1


select * from t2


-- query for table iii


select ITEMNMBR,currcost,[A] as A, [B] as B,[I] as I
from
(select IV1.ITEMNMBR as itemnmbr,
--iv1.ITEMDESC as itemdesc,
currcost,
substring(iv2.locncode,7,1) as locncode,QTYONHND
from t1 iv1 join t2 iv2 on iv1.itemnmbr = iv2.itemnmbr where QTYONHND <> 0) ps
PIVOT
(
sum(QTYONHND)
for locncode in
([A],[B],[I])
) as pvt


Wednesday, August 5, 2009

Identify saturday or sunday - sql script

declare date datetime

set date = '2008-08-03'
--for sunday
select case when datetime (dw,@date) = 'sunday' then 1 else 0 end

set date = '2008-08-02'
--for saturday
select case when datetime (dw,@date) = 'saturday' = 1 else 0 end